Español | Français | Italiano | Deutsch | Русский | Português | 简体中文 | 繁體中文 | 한국어 | 日本語
|
|
|
|
 |
Guided Assist Answer ID 50390: WD Security Password Protection for WD Drives Guided Assist |
WD Security features the ability to:
- Create a password to keep others from accessing the files on the drive
- Change the password
- Remove password protection
- Unlock drive
Software Download
Instructions for Windows and macOS
- About WD Security
- Download and Install on Windows
- Download and Install on macOS
- Set Password
- Auto-Unlock Drive Details (Enable and Disable)
- Unlock Drive With WD Security Software
- Unlock Drive Without WD Security Software (WD Unlocker)
- Change Password
- Remove Password
- Answer ID 51136: Steps to Uninstall WD Drive Utilities or WD Security Software on Windows
- Answer ID 51137: Steps to Uninstall WD Drive Utilities or WD Security Software on macOS
Need more help?
- Answer ID 6265: Attach a Supported WD Drive Message in WD Security & WD Drive Utilities
- Answer ID 50557: WD Security Failed to Erase Drive After 5 Incorrect Password Attempts
- Answer ID 4677: Invalid Password or Forgotten Password Message on WD Security
- Answer ID 20555: WD Security Password Protected Drive Auto Unlock Not Working
- Answer ID 7502: Password Protected Unlock Prompt Not Displayed for a WD My Book
- Answer ID 51239: Steps to Remove WD Unlocker
About WD Security
WD Security allows password protection of external drives that support 256-bit AES hardware encryption from unauthorized use or access. The computer must be able to run .exe files.
WD Security features the ability to:
- Create a password to keep others from accessing the files on the drive
- Change the password
- Remove password protection
- Unlock drive
IMPORTANT:
- WD Security uses the set password to lock and unlock the drive.
- All of the data will be lost if the password is forgotten.
Tech Support cannot recover and password.
THE DRIVE WILL NEED TO BE ERASED BEFORE IT CAN BE USED AGAIN.
Need more help?
Answer ID 4677: Invalid Password or Forgotten Password Message on WD Security
Supported Drives
- Direct Attached Storage (DAS) Drives: My Book, My Book for Mac, My Book Duo, WD Drive Plus, My Passport works with USB-C, My Passport, My Passport for Mac, My Passport Ultra, My Passport Ultra for Mac, My Passport Ultra (USB-C), My Passport Ultra for Mac (USB-C), My Passport Ultra Metal, WD Backup Drive Desktop
- Does not work with other vendor drives or WD drives not setup for use with WD Security
- Drives not listed are not supported.
Need more help?
- Answer ID 2158: External Drives Not Supported by WD Security
- Answer ID 51136: Steps to Uninstall WD Drive Utilities or WD Security Software on Windows
Supported Operating Systems
Windows
- Windows 11
- Windows 10 32-bit & 64-bit
Download and Install on Windows
Download and install WD Security on Windows.
- Download WD Security.
WD Security for Windows - Go to Downloads folder and find WDSecurity_WIN.zip.
Right-click WDSecurity_WIN.zip.
Select Extract All.
Click Extract.
Double-click into the WDSecurity_WIN folder.
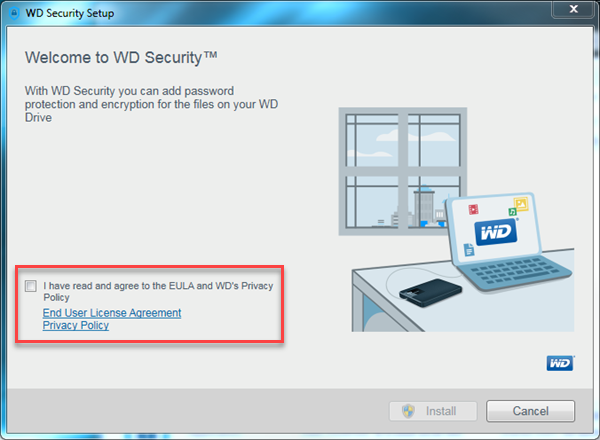
Double-click WDSecuritySetup.exe. - Read the EULA (End User License Agreement).
Check the box.
Click Install.
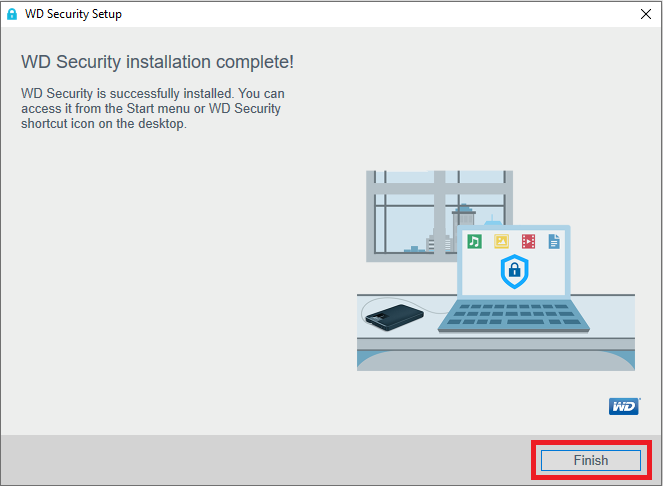
- Click Finish.
Start WD Security
- Connect a supported drive to the computer.
- Direct Attached Storage (DAS) Drives: My Book, My Book for Mac, My Book Duo, WD Drive Plus, My Passport works with USB-C, My Passport, My Passport for Mac, My Passport Ultra, My Passport Ultra for Mac, My Passport Ultra (USB-C), My Passport Ultra for Mac (USB-C), My Passport Ultra Metal, WD Backup Drive Desktop
- Does not work with other vendor drives or WD drives not setup for use with WD Security
- Drives not listed are not supported.
Need more help?
- Enter WD Security in the search bar.
- Double-click WD Security.
Download and Install on macOS
Download and install WD Security on macOS.
- Download WD Security.
IMPORTANT:Rosetta 2 needs to be installed on Macs with Apple silicon to use with WD Security.
Need more help?
Answer ID 51595: Steps to Install Rosetta App for WD Security
- Go to Downloads folder.
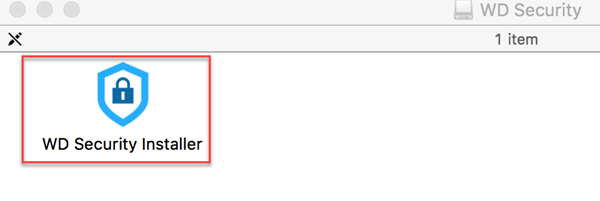
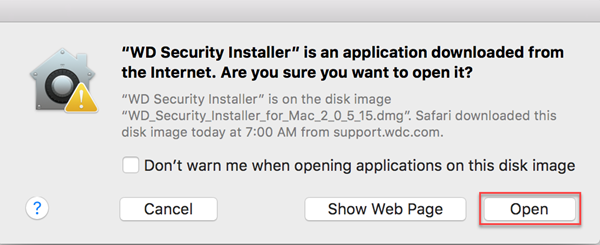
Unzip WD_Security_MACOS.zip. - Open WD Security Installer.dmg.
Open exec folder. - Double-click WD Security Installer.
- Click Open.
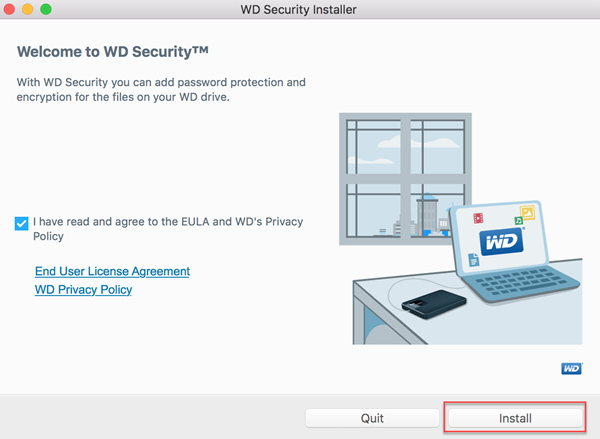
- Read the EULA (End User License Agreement).
Check the box.
Click Install.
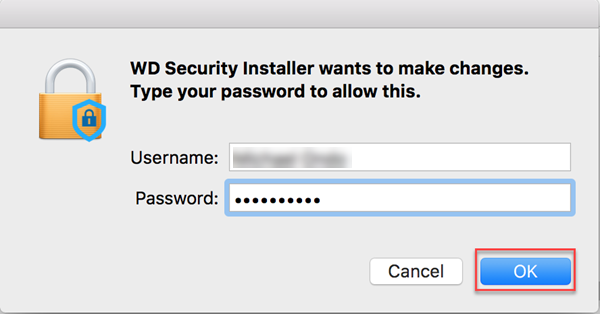
- Enter an admin username and password.
Click OK.
- Click Finish.
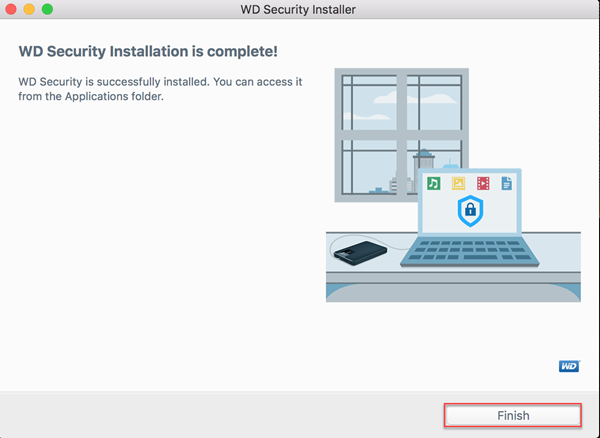
- Open Finder.
Select Applications.
Double-click WD Security to open.
Start WD Security
- Connect a supported drive to the computer.
- Direct Attached Storage (DAS) Drives: My Book, My Book for Mac, My Book Duo, WD Drive Plus, My Passport works with USB-C, My Passport, My Passport for Mac, My Passport Ultra, My Passport Ultra for Mac, My Passport Ultra (USB-C), My Passport Ultra for Mac (USB-C), My Passport Ultra Metal, WD Backup Drive Desktop
- Does not work with other vendor drives or WD drives not setup for use with WD Security
- Drives not listed are not supported.
Need more help?
- Enter WD Security in the Spotlight search bar.
- Double-click WD Security.
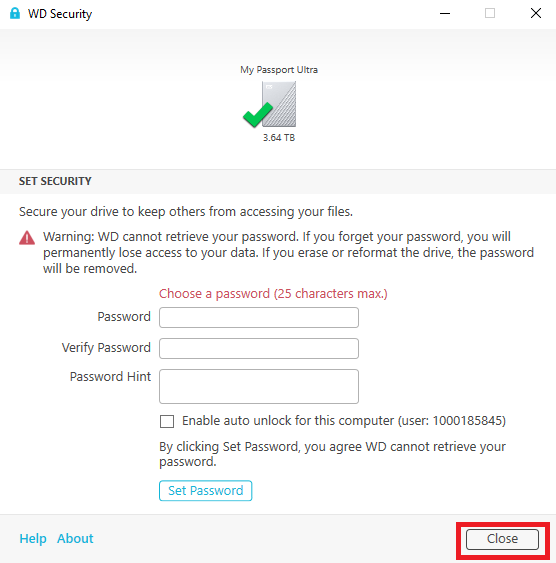
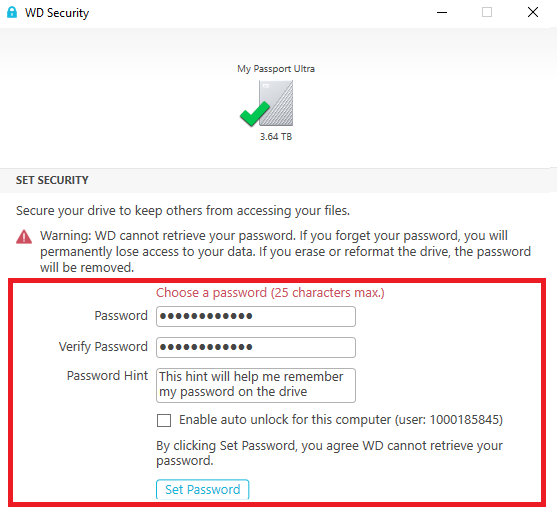
Set a Password
Set a password and protect the data on the drive.
 |
Critical:
|
- Connect a drive.
- Open WD Security.
- Enter a password.
The password can have a maximum of 25 characters.
Verify Password by entering the same password again.
Enter a Password Hint that will help remember the password if forgotten.
Check the box next to Enable Auto Lock.
The drive will auto-unlock when connected to a computer with the same local user name.
Click Set Password.
- Click Close.
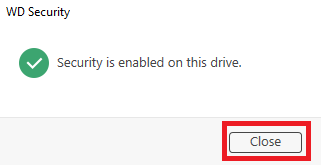
- Click Close and exit WD Security.
IMPORTANT:- The Remove password option is selected by default in this screen.
- Entering the password on this screen will Remove the password that was just created.
- Click Close and exit WD Security to keep password protection on.

- Safe Eject and remove the drive.
Need more help?
Answer ID 21880: Steps to Safe Eject and Remove External Drives on Windows or macOS - Connect the drive to the computer again.
Auto-Unlock Drive Details (Enable and Disable)
WD Security allow the drive to auto-unlock for this computer when a password is set.
Auto-unlock DOES NOT occur for any other user account on the computer which enabled the feature (unless that user also enabled auto-unlock, for that drive, on that computer).
IMPORTANT:
Auto-unlock conditions may vary based on the drive make and model.
- Drives may lock during reboot or sign-off due to their connection to the operating system USB suspend process.
- Drives may remain unlocked when the USB process is suspended.
Safe Eject and remove the drive to ensure the drive is locked and secure.
Need more help?
Change Password is needed to Turn ON and OFF auto-lock.
The same password can be used again.
Turn On Auto-UnLock
- Connect a drive.
- Open WD Security.
- Select Change Password.
Enter the correct Current Password.
Enter a New Password.
Verify the New Password.
Enter a New Password Hint.
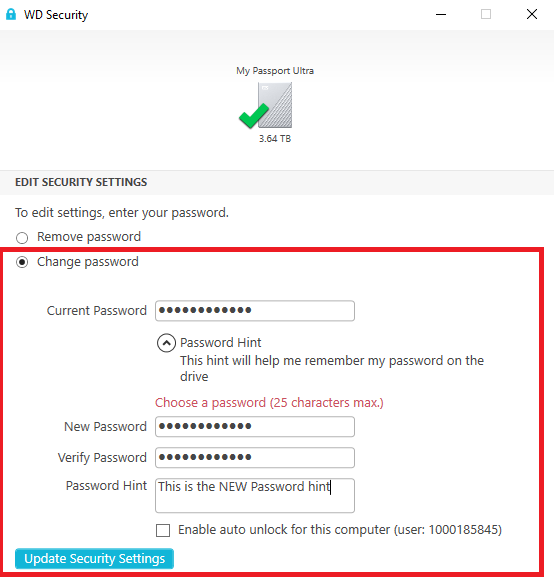
Check the box Enable auto unlock for this computer (user: XYZ)
Click Update Security Settings.

Turn Off Auto-UnLock
- Connect a drive.
- Open WD Security.
- Select Disable auto unlock for this computer (user: XYZ)
- Enter he correct Password.
Click Update Security Settings.
- Click Close.
- Click Close.
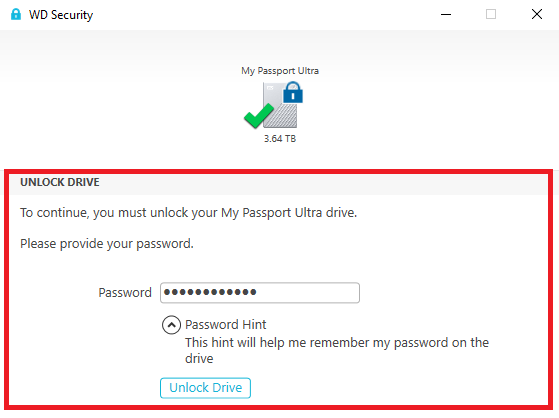
Unlock With WD Security Software
Use WD Security Software to unlock the drive.
|
Critical:
|
- Connect a drive.
- Open WD Security.
- Select a drive to unlock.
- Enter the correct password.
Click Unlock Drive.

Click Password Hit if the password cannot be remembered and was setup when the password was set.
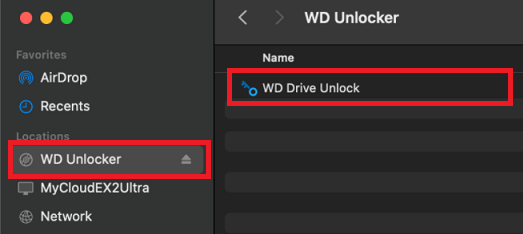
Unlock Without WD Security Software (WD Unlocker)
WD Drive Unlocker (Virtual CD (VCD) can be used to unlock a drive when WD Security Software is not installed.
|
Critical:
|
- Connect a drive.
- Open Windows Explorer or macOS Finder.
Double-click WD Unlocker.
Couble-click WD Drive Unlock.
Windows macOS 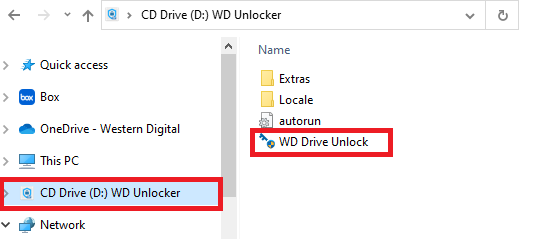
- Click Yes on Windows.
Click OK on macOS.
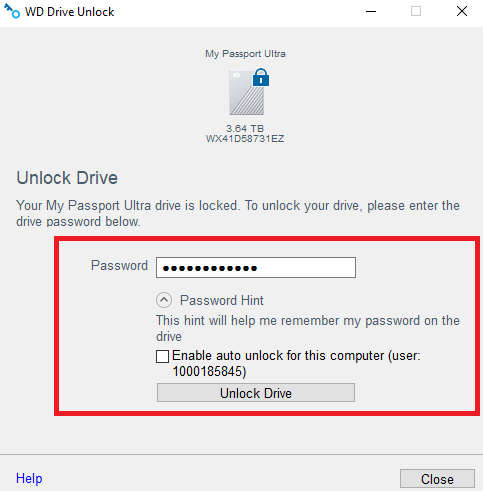
Windows macOS 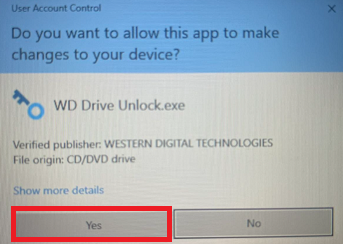

- Enter the correct password.
Click Unlock Drive.
Click Password Hit if the password cannot be remembered and was setup when the password was set.
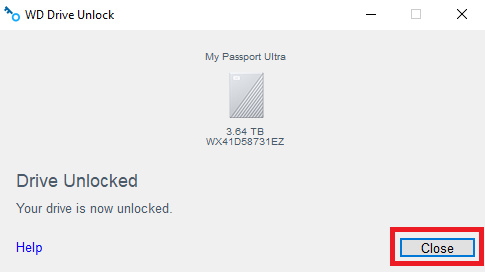
- Click Close.
Need more help?
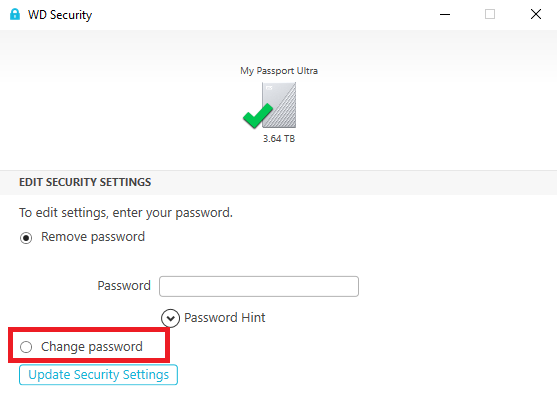
Change Password
Change the password on a protected drive.
- Enter the correct password.
Click Password Hit if the password cannot be remembered and was setup when the password was set.
Click Unlock Drive. - Select Change Password.
Critical:
-
The Remove password option is selected by default in this screen.
-
Entering the password on this screen will Remove the password that was just created.
-
Select Change Password.
-
- Enter the Current Password.
Click Password Hit if the password cannot be remembered and was setup when the password was set.
Enter a New Password.
Verify the New Password.
Enter a New Password Hint.
- Click Update Security Settings.
Critical:
-
WD Security uses the set password to lock and unlock the drive.
-
All of the data will be lost if the password is forgotten.
Tech Support cannot recover and password.
THE DRIVE WILL NEED TO BE ERASED BEFORE IT CAN BE USED AGAIN.
Need more help?
Answer ID 4677: Invalid Password or Forgotten Password Message on WD Security
-
- Click Close.
- Click Close and exit WD Security.
IMPORTANT:- The Remove password option is selected by default in this screen.
- Entering the password on this screen will Remove the password that was just created.
- Click Close and exit WD Security to keep password protection on.
- Safe Eject and remove the drive.
Need more help?
Answer ID 21880: Steps to Safe Eject and Remove External Drives on Windows or macOS - Connect the drive to the computer again.
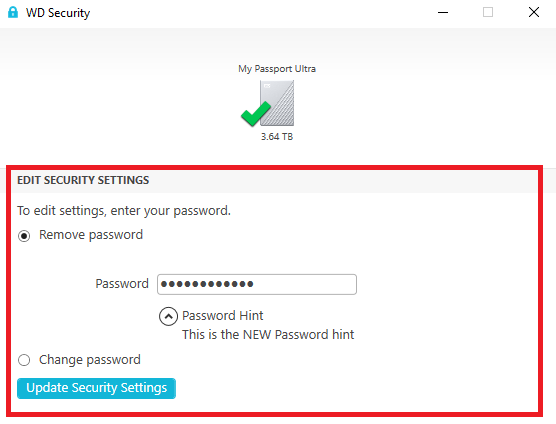
Remove Password
Remove password protection from a drive.
- Open WD Security.
- Connect a drive.
- Select Remove Password.
Enter the Correct Password.
Click Password Hit if the password cannot be remembered and was setup when the password was set.
- Click Update Security Settings.
Critical:
-
WD Security uses the set password to lock and unlock the drive.
-
All of the data will be lost if the password is forgotten.
Tech Support cannot recover and password.
THE DRIVE WILL NEED TO BE ERASED BEFORE IT CAN BE USED AGAIN.
Need more help?
Answer ID 4677: Invalid Password or Forgotten Password Message on WD Security
-
- Click Close.
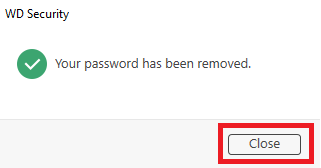
- Click Close.